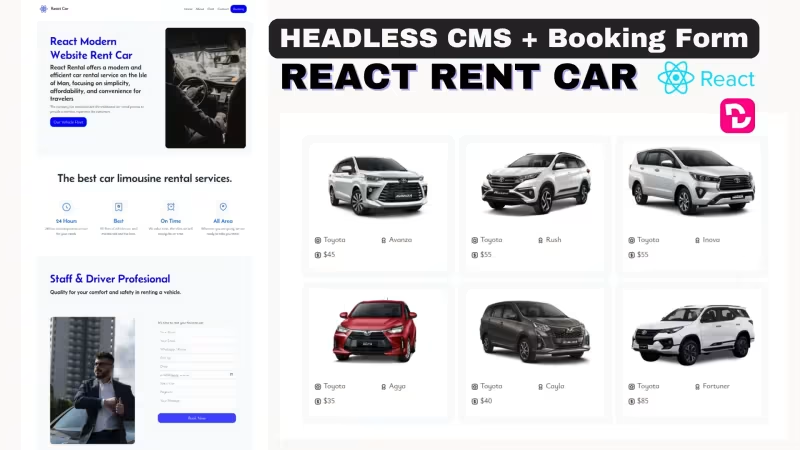
React Web Themes Rent Car
React Car is a modern book website for your rent car and limousine services, integration with headless decap cms to make easier for you update your website quickly.
Features
- React Tech
- Vite Js
- JSX Lang
- Minimalist UI
- Clean Design
- Booking Form
- Booking Page
- Car Fleet List
- Car Fleet Detail
- React Helmet Auto SEO
- Headless Decap CMS
- Modern Host support netlify vercel cloudflare and others
- Build production host firebase surge cpanel vps direct admin plesk and others
Copy URL
Embed Code
How To
1
Download or Order Template
2
Read Documentation Project
3
Run Project on your website
themestemplate website themes website template react template rentcar booking reactthemes vitethemes jamstackthemes premiumthemes
React Web Themes Rent Car Content Docs
Documentation .
How to install and work with React Car CMS Themes project.
React Car .
A react themes for your rent car projects.
- Helmet Auto SEO Injection
- Meta Tag
- Open Graph
- Twitter Card
- Online Booking Form - Redirect your email
- Home Page
- About Page
- Booking Page
- Contact Page
- Car List Page
- Car Detail Page + Book Form
- More..
Installation .
- Need to install Node Js, Download
- Open terminal and run
npm install - Run frontend
npm run devopenlocalhost:5173 - Run Backend
npx decap-server - Access Admin area
localhost:5173/admin
Headless CMS Backend Login .
We have setup for your backend headless cms is work on local, but if you want deploy in to your netlify host, you can change configuration file , open on public/admin/config.yml , next you can remove localbackend: true
Code implementation for work on local device react car headless cms
local_backend: true
backend:
  name: git-gateway
  branch: main
Code implementation for work on cloud online react car headless cms
backend:
  name: git-gateway
  repo: yourgithubaccount/yourrepo
  branch: main
Setup Your Site .
Open Backend CMS and access on setup configuration and open Configuration Website
Now you can add your icon for favicon logo
Insert your company ID - this information use on footer and contact page.
Next you can settup your payment method, example local bank and other digital online payment app.
You can update navbar on navbar area, to add new click on add navbar+ Button , insert your nav name and url link.
You can also update your navbar button and navbar button link.
Update car widget in to Car list title and car button.
In Help Area, you can insert your Title, button text and button link.
Footer Icon is for update your footer icon.
Menu Nav Footer is for update your nav footer menu.
Social Nav Footer is for update your social nav area.
Home Page .
Back in to Dashboard Backend Headless CMS , and access on Home Page, open Content Home Page Menu.
Now you can update title, description , Intro Text, Cover Photo, Cars Button, others on this area.
About Page .
Back in to Dashboard Backend CMS, and access on About Page, open in to Content About Page.
Now you can update title,description , cover foto, and content article.
To Add new content article , you can click on add content article button.
Contact Page .
To Update your contact page you can access on Contact Page, and open Content Contact Page.
Now you can update , title, description and cover image.
If you want to change / update or add new contact information, you can access on configuration menu, and you can add new contact in to Company ID.
Car List Page .
If you want to update fleet or car list page , open on Car Page, and open content car page.
Next you can update title, description and cover image photo.
Booking Page .
To update booking page area, you can access on Booking Page, and open Content Booking page.
Now you can update title, description and cover image.
If you want to update payment method information, you can update on configuration - and update or add new payment account, you can add your local bank and digital online payment on this area.
Car Fleet Unit .
Open dashboard backend headless cms, access on Car unit, and open list all car unit.
You can update or create new, to create new click on add car database unit button, and insert information about your fleet / car in this area.
To Update click Publish button on header , and select publish now.
Media File .
If you want to upload media file such image, pdf ,and others, you can access on Media menu in header area. And upload your file on this menu.
Log Out .
To Log out from backend headless react rent car cms,you can click on user icon in header nav, and select log out.
Email Form .
To Activate email form, make sure you have input your email in to configuration - email for booking form menu.
Step 1 : Make sure you have deploy your site in to host server - Your website is live.
Step 2 : Test insert booking form
Step 3 : Check Your Email Inbox, and Click Activate
Step 4 : After you have activate now your booking form will be integration with your email.
Build Production + Backend Healdess CMS .
After you have setup your site, now you can deploy your react car project in to netlify host, push your project in to github repo, login in to your netlify account, or you can create new account on netlify with your github account, next you can create new projects - select github - select your project repo - and click deploy.
To Activate Headless CMS - you can access on netlify identity, activate git gateway , and select login schema with github or google account, next you can change from open to invite only.
Build Production Without Backend CMS .
You can also deploy your project in to modern other static host such vercel, or cloudflare, push your project in to your github repo, and login in to your vercel,cloudflare account, create new projects - select your github repo - select react as tech - and click deploy.
Or you can insert npm run build in to build command.
If you want run in to PHP hosting / Firebase / Surge , you can upload your build production. open terminal and run npm run build , next test your build prodcution with run npm run preview and open localhost:4173, if everything is ok, you can upload your build production site dist in to your hosting.
Thank You by using React Car CMS themes template project .
We hope with this react car project you can build modern website for your rent car projects.
Project .
React Custom Website Hire Now
Skeleton themes template
UPDATE NEW THEMES TEMPLATE
Select your favorite technology and website blog themes template


